There are a few useful hotkeys (keyboard shortcuts) introduced in Windows 8 which can make your Windows 8 experience better. Some of them are given below:

Win key Toggles between Start Screen and Windows Desktop
Win+X Opens Quick Access Menu
Win+PrntScr Automatically saves screenshot in Pictures folder
Win+C Shows Charms Bar
Win+I Shows Settings panel
Win+K Launches Devices charm
Win+H Launches Share charm
Win+Q Launches Search charm
Win+W Launches Settings search page
Win+F Launches Files search page
Win+Tab Shows Metro apps switcher as mentioned in point 4
Win+Z Shows / hides App bar at Start Screen to show all apps
Win+Spacebar Toggles between input languages and keyboard layout
Win+, From Start Screen peeks at the Desktop
Win+Enter Launches Narrator
Ctrl+F1 Minimizes / maximizes ribbon in Windows Explorer
Ctrl+Tab Launches All Apps list on Start Screen
Win+spacebar Toggles between input languages and keyboard layout
Win+, Peeks at the desktop
Win+Enter Starts Narrator
Win+PgUp Moves full screen window (i.e., the new Metro UI) to the monitor on the left in multi-mon
situations.
Win+PgDn Moves full screen to the right
Win+Shift + . Snaps application and/or moves the snapped app to left
Win+. Snaps application and/or moves the snapped app to right
Win+k Opens Devices charm
Win+h Opens Share charm
Win+q Opens Search charm
Win+w Opens Settings search
Win+f Opens Files search
Win+z Toggle AppBar
Programming languages are used to communicate with system machine or programs, and used to develop programs. Ada Lovelace is the first Computer Programmer, she is student of Charles Babbage, Ada Lovelace wrote code for Charles Babbage's Analytical Engine.Most popular Programming Language "C"
"C" programming language is the post popular programming language ever, "C" is developed by Dennis Ritchie. Around 90% of programs are written in C and C++ programming languages. C++ is the advanced version of C developed by Bjarne Stroustrup.
 How to delete the Windows.old folder
after installation of Windows::. If you are installing Windows on a hard
drive where Windows is already installed,
and installing includes upgrading to
Windows 8, you may end up with a
Windows.old folder
on the partition you
have installed the new Windows version on. This is basically the Windows folder of
the old installation which can be large in
size.
The Windows.old folder can easily be larger
than 10 Gigabytes, and since it is usually
not needed anymore, it makes sense to
delete the folder and all of its contents to
free up space.
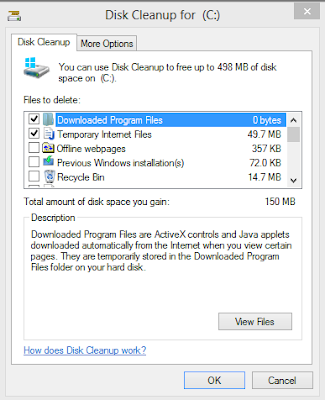
>>Delete the Windows.old folder using the
Disk Cleanup tool
>>Press Windows-R to bring up the run box
>>Enter cleanmgr and hit Enter, This loads
the Disk Cleanup tool
>>Locate and click on the Clean up system files button and accept the UAC prompt if it
is displayed on the system
>>Check the Previous Windows installation
(s) option to include all Windows.old
folders in the cleanup and click on ok
afterwards. The Disk Cleanup tool will then go ahead
and delete all the folders and files that you
have selected. The Windows.old folder
should be gone after the cleanup.
As you browse the Internet, each of the items you view are saved locally on your hard drive. This helps web pages you visit frequently load faster by loading the files from you hard drive instead of having to downloading the web page again. To conserve hard drive space or to help keep their Internet browsing private, users may find it necessary to delete their Internet History, below is how to do this.
Microsoft Internet Explorer users
Tip: Users running Internet Explorer 7.0 and above will need to press the Alt key in order to access the file menu to get access to options such as File, Tools, etc.
Viewing History
- Microsoft Internet Explorer 7 and above users can view their history files by clicking the "Tools" menu, "Internet Options", clicking the "Settings" button under the Browsing history, and then clicking the "View Files" button.
- Microsoft Internet Explorer 6.x users can view their history files by clicking the "Tools" menu, "Internet Options", clicking the "Settings" button, and then clicking the "View Files" button.
Deleting History
Press CTRL + Shift + DEL to open the Clear Browsing History window.
or
- Microsoft Windows users running Microsoft Internet Explorer 6 and above can delete their history files by clicking the "Tools" menu, "Internet Options", and clicking the "Delete Files" or "Delete" button. Users also have the option of automatically deleting files each time the close the browser window by clicking the "Advanced" tab and checking "Empty Temporary Internet Files folder when browser is closed" under the "Security" section.
- Microsoft Internet Explorer 4.x users on an Apple Macintosh can delete the history by clicking the "Hard Drive" icon, "System", "Preferences", "Explorer", and moving the history file into the trash.
- Microsoft Internet Explorer 3.02 and lower users can delete their history by clicking the "View" menu, "Options", open the tab "Advanced", click the "Settings" tab, and click the "Empty Folder" button.
Viewing History
Press Ctrl + H to open the left-side history bar.
or
Click History at the top of the window.
or
Users using earlier versions of Mozilla Firefox can also view their history by clicking "Go" and clicking "History."
Deleting History
Press CTRL + Shift + DEL to open the Clear All History window.
or
Mozilla Firefox users can clear their history by clicking the "Tools" menu, "Options", clicking the "Privacy" button, and under "History" click the "Clear" or "Clear Now" button.
Tip: If you don't see the File, Edit, View menu press the Alt key.
Viewing History
Press Ctrl + H to open the left-side history bar.
or
Click on the "wrench" icon

, which is located near the top-right side of the browser window and then click
History.
Press CTRL + Shift + DEL to open the Clear Browsing Data Window.
or
- Click on the "wrench" icon , which is located near the top-right side of the browser window.
- Move your mouse over Tools, then select Clear browsing data...

- Select the amount of time you want to go back to delete in your history. You can choose from the past hour, the past day, the past week, the last four weeks, and the beginning of time.
- Select the types of history you would like to delete. You can choose as many as you like from this list: Clear browsing history, Clear download history, Empty the cache, Delete cookies and other site and plug-in data, Clear saved passwords, and Clear saved Autofill form data.

- Click the Clear browsing data button. This will clear the selected types of Internet history for the chosen time period.
Viewing History
Click Help and then About. Within the About Opera window you'll see the full path to where the cached files are stored. Browse to that file path to view cached files.
Deleting History
Opera users can delete their history by clicking the "File" menu, "Preferences", "History", and click "Empty now" button. In addition, users can check "Empty on exit" if they wish for this task to occur each time they exit the browser.
Viewing History
Press Ctrl + H to open the left-side history bar.
or
Click on the "gear" icon

, which is located near the top-right side of the browser window and then click
History.
- Click on the "gear" icon , which is located near the top-right side of the browser window.
- Click the Reset Safari... link to get the below window. Leave everything checked if you want to clear everything out or just keep Clear history checked to clear the history. Once your options have been selected click the Reset button.
Netscape users
Viewing History
- Microsoft Windows users can view history by first opening Netscape and click the "Edit" menu, "Preferences", "History", and view the location where Netscape is storing your files. Next, open this folder within Explorer.
Deleting History
- Netscape users can delete their history files by clicking the "Edit" menu, "Preferences", "History", and click the "Clear History" button.
Keyboard Shorcuts (Microsoft Windows)
1. CTRL+C (Copy)
2. CTRL+X (Cut)
... 3. CTRL+V (Paste)
4. CTRL+Z (Undo)
5. DELETE (Delete)
6. SHIFT+DELETE (Delete the selected item permanently without placing the item in the Recycle Bin)
7. CTRL while dragging an item (Copy the selected item)
8. CTRL+SHIFT while dragging an item (Create a shortcut to the selected item)
9. F2 key (Rename the selected item)
10. CTRL+RIGHT ARROW (Move the insertion point to the beginning of the next word)
11. CTRL+LEFT ARROW (Move the insertion point to the beginning of the previous word)
12. CTRL+DOWN ARROW (Move the insertion point to the beginning of the next paragraph)
13. CTRL+UP ARROW (Move the insertion point to the beginning of the previous paragraph)
14. CTRL+SHIFT with any of the arrow keys (Highlight a block of text)
SHIFT with any of the arrow keys (Select more than one item in a window or on the desktop, or select text in a document)
15. CTRL+A (Select all)
16. F3 key (Search for a file or a folder)
17. ALT+ENTER (View the properties for the selected item)
18. ALT+F4 (Close the active item, or quit the active program)
19. ALT+ENTER (Display the properties of the selected object)
20. ALT+SPACEBAR (Open the shortcut menu for the active window)
21. CTRL+F4 (Close the active document in programs that enable you to have multiple documents opensimultaneou sly)
22. ALT+TAB (Switch between the open items)
23. ALT+ESC (Cycle through items in the order that they had been opened)
24. F6 key (Cycle through the screen elements in a window or on the desktop)
25. F4 key (Display the Address bar list in My Computer or Windows Explorer)
26. SHIFT+F10 (Display the shortcut menu for the selected item)
27. ALT+SPACEBAR (Display the System menu for the active window)
28. CTRL+ESC (Display the Start menu)
29. ALT+Underlined letter in a menu name (Display the corresponding menu) Underlined letter in a command name on an open menu (Perform the corresponding command)
30. F10 key (Activate the menu bar in the active program)
31. RIGHT ARROW (Open the next menu to the right, or open a submenu)
32. LEFT ARROW (Open the next menu to the left, or close a submenu)
33. F5 key (Update the active window)
34. BACKSPACE (View the folder onelevel up in My Computer or Windows Explorer)
35. ESC (Cancel the current task)
36. SHIFT when you insert a CD-ROMinto the CD-ROM drive (Prevent the CD-ROM from automatically playing)
Dialog Box - Keyboard Shortcuts
1. CTRL+TAB (Move forward through the tabs)
2. CTRL+SHIFT+TAB (Move backward through the tabs)
3. TAB (Move forward through the options)
4. SHIFT+TAB (Move backward through the options)
5. ALT+Underlined letter (Perform the corresponding command or select the corresponding option)
6. ENTER (Perform the command for the active option or button)
7. SPACEBAR (Select or clear the check box if the active option is a check box)
8. Arrow keys (Select a button if the active option is a group of option buttons)
9. F1 key (Display Help)
10. F4 key (Display the items in the active list)
11. BACKSPACE (Open a folder one level up if a folder is selected in the Save As or Open dialog box)
Microsoft Natural Keyboard Shortcuts
1. Windows Logo (Display or hide the Start menu)
2. Windows Logo+BREAK (Display the System Properties dialog box)
3. Windows Logo+D (Display the desktop)
4. Windows Logo+M (Minimize all of the windows)
5. Windows Logo+SHIFT+M (Restorethe minimized windows)
6. Windows Logo+E (Open My Computer)
7. Windows Logo+F (Search for a file or a folder)
8. CTRL+Windows Logo+F (Search for computers)
9. Windows Logo+F1 (Display Windows Help)
10. Windows Logo+ L (Lock the keyboard)
11. Windows Logo+R (Open the Run dialog box)
12. Windows Logo+U (Open Utility Manager)
13. Accessibility Keyboard Shortcuts
14. Right SHIFT for eight seconds (Switch FilterKeys either on or off)
15. Left ALT+left SHIFT+PRINT SCREEN (Switch High Contrast either on or off)
16. Left ALT+left SHIFT+NUM LOCK (Switch the MouseKeys either on or off)
17. SHIFT five times (Switch the StickyKeys either on or off)
18. NUM LOCK for five seconds (Switch the ToggleKeys either on or off)
19. Windows Logo +U (Open Utility Manager)
20. Windows Explorer Keyboard Shortcuts
21. END (Display the bottom of the active window)
22. HOME (Display the top of the active window)
23. NUM LOCK+Asterisk sign (*) (Display all of the subfolders that are under the selected folder)
24. NUM LOCK+Plus sign (+) (Display the contents of the selected folder)
25. NUM LOCK+Minus sign (-) (Collapse the selected folder)
26. LEFT ARROW (Collapse the current selection if it is expanded, or select the parent folder)
27. RIGHT ARROW (Display the current selection if it is collapsed, or select the first subfolder)
Shortcut Keys for Character Map
After you double-click a character on the grid of characters, you can move through the grid by using the keyboard shortcuts:
1. RIGHT ARROW (Move to the rightor to the beginning of the next line)
2. LEFT ARROW (Move to the left orto the end of the previous line)
3. UP ARROW (Move up one row)
4. DOWN ARROW (Move down one row)
5. PAGE UP (Move up one screen at a time)
6. PAGE DOWN (Move down one screen at a time)
7. HOME (Move to the beginning of the line)
8. END (Move to the end of the line)
9. CTRL+HOME (Move to the first character)
10. CTRL+END (Move to the last character)
11. SPACEBAR (Switch between Enlarged and Normal mode when a character is selected)
Microsoft Management Console (MMC)
Main Window Keyboard Shortcuts
1. CTRL+O (Open a saved console)
2. CTRL+N (Open a new console)
3. CTRL+S (Save the open console)
4. CTRL+M (Add or remove a console item)
5. CTRL+W (Open a new window)
6. F5 key (Update the content of all console windows)
7. ALT+SPACEBAR (Display the MMC window menu)
8. ALT+F4 (Close the console)
9. ALT+A (Display the Action menu)
10. ALT+V (Display the View menu)
11. ALT+F (Display the File menu)
12. ALT+O (Display the Favorites menu)
MMC Console Window Keyboard Shortcuts
1. CTRL+P (Print the current page or active pane)
2. ALT+Minus sign (-) (Display the window menu for the active console window)
3. SHIFT+F10 (Display the Action shortcut menu for the selected item)
4. F1 key (Open the Help topic, if any, for the selected item)
5. F5 key (Update the content of all console windows)
6. CTRL+F10 (Maximize the active console window)
7. CTRL+F5 (Restore the active console window)
8. ALT+ENTER (Display the Properties dialog box, if any, for theselected item)
9. F2 key (Rename the selected item)
10. CTRL+F4 (Close the active console window. When a console has only one console window, this shortcut closes the console)
Remote Desktop Connection Navigation
1. CTRL+ALT+END (Open the Microsoft Windows NT Security dialog box)
2. ALT+PAGE UP (Switch between programs from left to right)
3. ALT+PAGE DOWN (Switch between programs from right to left)
4. ALT+INSERT (Cycle through the programs in most recently used order)
5. ALT+HOME (Display the Start menu)
6. CTRL+ALT+BREAK (Switch the client computer between a window and a full screen)
7. ALT+DELETE (Display the Windows menu)
8. CTRL+ALT+Minus sign (-) (Place a snapshot of the active window in the client on the Terminal server clipboard and provide the same functionality as pressing PRINT SCREEN on a local computer.)
9. CTRL+ALT+Plus sign (+) (Place asnapshot of the entire client window area on the Terminal server clipboardand provide the same functionality aspressing ALT+PRINT SCREEN on a local computer.)
Microsoft Internet Explorer Keyboard Shortcuts
1. CTRL+B (Open the Organize Favorites dialog box)
2. CTRL+E (Open the Search bar)
3. CTRL+F (Start the Find utility)
4. CTRL+H (Open the History bar)
5. CTRL+I (Open the Favorites bar)
6. CTRL+L (Open the Open dialog box)
7. CTRL+N (Start another instance of the browser with the same Web address)
8. CTRL+O (Open the Open dialog box,the same as CTRL+L)
9. CTRL+P (Open the Print dialog box)
10. CTRL+R (Update the current Web page
There are 5 steps to remove BitLocker Drive Encryption from removable drive. Here are the steps.
- Open Control Panel then click on BitLocker drive encryption link.
2.On the nest window, click Turn Off BitLocker link on your removable drive or USB flash drive.
3.Next, the BitLocker Drive Encryption window will appear, click on Decrypt Drive button to start the decryption process.
4.The decryption progress takes some minutes to finish, so wait until the process completed. Do not plug off your removable drive during the process.
5.After the process completed, a message box appears, tell you the decryption process was completed. Click on Close button to close the window.
Now, you have successfully remove BitLocker from your USB flash drive. But, the drive doesn’t protected anymore and there is a chance the data being stolen.
This section describes how to identify hardware virtualization extensions and enable them in your BIOS if they are disabled.
The Intel VT extensions can be disabled in the BIOS. Certain laptop vendors have disabled the Intel VT extensions by default in their CPUs.
The virtualization extensions can not be disabled in the BIOS for AMD-V.
Verify the virtualization extensions are enabled in BIOS. The BIOS settings for Intel® VT or AMD-V are usually in the or menus. The menu names may vary from this guide, the virtualization extension settings may be found in Security Settings or other non standard menu names.
Procedure 32.1. Enabling virtualization extensions in BIOS
Reboot the computer and open the system's BIOS menu. This can usually be done by pressing the delete key, the F1 key or Alt and F4 keys depending on the system.
Select Restore Defaults or Restore Optimized Defaults, and then select Save & Exit.
Power off the machine and disconnect the power supply.
Enabling the virtualization extensions in BIOS
Note: BIOS steps
Many of the steps below may vary depending on your motherboard, processor type, chipset and OEM. Refer to your system's accompanying documentation for the correct information on configuring your system.
Power on the machine and open the BIOS (as per Step 1).
Open the Processor submenu The processor settings menu may be hidden in the Chipset, Advanced CPU Configuration or Northbridge.
Enable Intel Virtualization Technology (also known as Intel VT) or AMD-V depending on the brand of the processor. The virtualization extensions may be labeled Virtualization Extensions, Vanderpool or various other names depending on the OEM and system BIOS.
Enable Intel VTd or AMD IOMMU, if the options are available. Intel VTd and AMD IOMMU are used for PCI passthrough.
Select Save & Exit.
Power off the machine and disconnect the power supply.
Run cat /proc/cpuinfo | grep vmx svm. If the command outputs, the virtualization extensions are now enabled. If there is no output your system may not have the virtualization extensions or the correct BIOS setting enabled.


