

Hi Friends..!!
I am back with another facebook prank which you can play on your friends. This prank is totally based on the Inspect Element in Google Chrome (This trick will work ONLY in Google Chrome). This is a very easy trick just right click on the element or part of the page you want to change. In case you want to change the introductory line. Right click on it and click on Inspect Element. You will see a dialog box will open below. Now you will see text displayed as
''Facebook helps you connect and share with the people in your life.' ' .

Right click on the line and select Edit as HTML. You can edit it and write anything you want. If you want to edit the main image of facebook you can do it by the same steps and put your picture there and fool your friends. Try out this trick and Enjoy...!!!
Nowadays people are very interested in using wireless devices. Technology is improving day by day, everyone have started to use hybrid technology products like touch screen laptops, iPhone, iPad and etc...
So I'll come to the point, mostly we are using wireless internet connection to access web via above mentioned devices. If you are using a wireless internet connection, you will set a password protection on your wireless network due to security reason.

Don't worry, here I have a solution to identify who are the people connected to your wireless network.

IP Address
MAC Address
The company that manufactured the network card
Optionally the computer name
MAC Address
The company that manufactured the network card
Optionally the computer name
Click Here to Download Wireless Network Watcher Version 1.57
Hi guys,
Today let's see about another working internet speedup trick. There are many tips and tricks available to speedup the internet connection. Already we have discussed many tricks to speedup internet connection. Today we will see how to speedup internet connection with top 10 high speed DNS servers.
Nowadays DNS servers have become a most important part in internet connection's speed. Sometimes you might see dongle's strength is in very good condition but the internet speed would be less. This all happen because of DNS servers. When you are using the default DNS provider from your ISP, it will be a slow access. You can speedup internet connection by using high speed DNS providers.

TOP 10 DNS SERVERS
Level3:
Preferred DNS server - 209.244.0.3
Alternate DNS server - 209.244.0.4
Google:
Preferred DNS server - 8.8.8.8
Alternate DNS server - 8.8.4.4
ScrubIT3:
Preferred DNS server - 67.138.54.120
Alternate DNS server - 207.225.209.77
OpenNIC4:
Preferred DNS server - 69.164.208.50
Alternate DNS server - 216.87.84.211
Public-Root5:
Preferred DNS server - 199.5.157.131
Alternate DNS server - 208.71.35.137
Comodo DNS:
Preferred DNS server - 8.26.56.26
Alternate DNS server - 8.20.247.20
OpenDNS:
Preferred DNS server - 208.67.222.222
Alternate DNS server - 208.67.220.220
DNS Advantage:
Preferred DNS server - 156.154.70.1
Alternate DNS server - 156.154.71.1
Norton DNS:
Preferred DNS server - 198.153.192.1
Alternate DNS server - 198.153.194.1
SmartViper:
Preferred DNS server - 208.76.50.50
Alternate DNS server - 208.76.51.51
How to Speedup Internet connection with Top 10 High Speed Public DNS Servers?
Go to Control Panel
Then go to Network and Sharing Center
Click on Local Area Connection


OR
Double Click on Internet Protocol Version 4 (TCP/IPv4)

For exmple:

That's all you have done successfully !!
Google has included support for the Do Not Track privacy setting in its latest Chrome developer build, which was released SEPTEMBER 13, 2012.

Do Not Track — which aims to help users opt out of being tracked across Web sites for the purposes of targeted advertising — is contentious and still somewhat theoretical. But since Chrome is close to becoming the world’s most-used browser, if it’s not already, its support for DNT is pretty important.
Of all the major browser providers, Google had moved the slowest on Do Not Track, but had earlier this year agreed at the request of the Obama Administration that it would implement DNT.
Google spokesman Rob Shilkin said in an emailed statement, “We undertook to honor an agreement on DNT that the industry reached with the White House early this year. To that end we’re making this setting visible in our Chromium developer channel, so that it will be available in upcoming versions of Chrome by year’s end.”
When Do Not Track is turned on within a browser, a snippet that specifies “DNT:1” is added to the request header whenever a user wants to go to a new Web site. Once Chrome adds this to its full release, that will happen across all major browsers.
But critics say it’s not necessarily clear what sites and advertisers have to do in response to DNT being turned on.
That could be a significant problem, because users will think they’re not being tracked since they explicitly changed a setting (seems like a reasonable assumption!) — but they may just be making a request that can be ignored. Talk about defeating the purpose.
All the Web and advertising players are still sorting out how to deal with this; some, like Google, more reluctantly than others.
For instance, since Microsoft decided to turn on DNT by default in Internet Explorer 10, developers of the Apache Web server are now saying they will ignore Do Not Track requests from IE visitors because it goes against the spirit of DNT being a choice. Also, even though Facebook is doing its own ad exchange, it hasn’t agreed to participate in Do Not Track at all.
Tip: This document relates to all Internet browsers and anyone using Google's services. See our clearing browser history section if you're looking for steps on how to clear the Google Chrome or another browser's history.
 Whenever your computer is logged into any Google service any of the searches you perform using services such as the Google Search, Images, Maps, and YouTube is logged into the Web History. This is a great feature for those who need to find something they may have searched for in the past or just want a general idea of their searching habits. However, for others this may be thought of as a privacy concern. To view, edit, and disable this feature follow the below steps.
Log into the Google History page at: http://www.google.com/history. Once prompted, enter your Google's username and password. Once successfully logged in you'll see a screen similar to the below example.

Viewing the history
As can be seen above, you'll immediately see all recent web search history and results. To find a page you've visited in the past use the search bar or select the date in the Web Activity calendar. In the left bar (not pictured above) you can also filter these results by video, maps, images, etc.
Editing the history
To delete a search query or a web page you've visited, select the associated check box, and then select the Remove button. To delete all your Web History click the Remove all Web History button.
Disabling the history
Finally, if you wish to disable this feature click the Pause button. This pauses the Web History feature from logging any of your searches and being displayed on this page.
Tip: If you're not logged into any Google service, your web history is not logged.
Tip: Keep in mind that Google still logs every search query and associates each query with your IP address even with this feature paused. Disabling this feature though will prevent anyone who has access to your computer and your Google login information from viewing your search history. Additional details about Google's Privacy policy can be found on their Privacy FAQ.

Note: Following the steps in this document will clear your Internet browser browsing history each time you exit the browser. Although this may help protect your privacy it will also slow down your overall Internet experience. See how to clear your Internet browser history once for steps on how to clear your history one time.
- Click Tools and then Internet Options.
- Click the Settings button under Browsing history.
- Change the days to keep pages in history to 0.
- Click Ok.
- Click Tools and then Options.
- Click Privacy.
- Under Private Data check the Always clear my private data when I close Firefox check box.
- Click Ok.
- Click Tools and then Preferences.
- Click the Advanced tab.
- Click History.
- Set the Addresses to 0
- Click Ok.

As you browse the Internet, each of the items you view are saved locally on your hard drive. This helps web pages you visit frequently load faster by loading the files from you hard drive instead of having to downloading the web page again. To conserve hard drive space or to help keep their Internet browsing private, users may find it necessary to delete their Internet History, below is how to do this.
Microsoft Internet Explorer users
Mozilla Firefox users
Google Chrome users
Opera users
Safari users
Netscape Navigator users
Mozilla Firefox users
Google Chrome users
Opera users
Safari users
Netscape Navigator users
Microsoft Internet Explorer users
Viewing History
- Microsoft Internet Explorer 7 and above users can view their history files by clicking the "Tools" menu, "Internet Options", clicking the "Settings" button under the Browsing history, and then clicking the "View Files" button.
- Microsoft Internet Explorer 6.x users can view their history files by clicking the "Tools" menu, "Internet Options", clicking the "Settings" button, and then clicking the "View Files" button.
Press CTRL + Shift + DEL to open the Clear Browsing History window.
or
- Microsoft Windows users running Microsoft Internet Explorer 6 and above can delete their history files by clicking the "Tools" menu, "Internet Options", and clicking the "Delete Files" or "Delete" button. Users also have the option of automatically deleting files each time the close the browser window by clicking the "Advanced" tab and checking "Empty Temporary Internet Files folder when browser is closed" under the "Security" section.
- Microsoft Internet Explorer 4.x users on an Apple Macintosh can delete the history by clicking the "Hard Drive" icon, "System", "Preferences", "Explorer", and moving the history file into the trash.
- Microsoft Internet Explorer 3.02 and lower users can delete their history by clicking the "View" menu, "Options", open the tab "Advanced", click the "Settings" tab, and click the "Empty Folder" button.
Press Ctrl + H to open the left-side history bar.
or
Click History at the top of the window.
or
Users using earlier versions of Mozilla Firefox can also view their history by clicking "Go" and clicking "History."
Deleting HistoryPress CTRL + Shift + DEL to open the Clear All History window.
or
Mozilla Firefox users can clear their history by clicking the "Tools" menu, "Options", clicking the "Privacy" button, and under "History" click the "Clear" or "Clear Now" button.
Tip: If you don't see the File, Edit, View menu press the Alt key.
Press Ctrl + H to open the left-side history bar.
or
Click on the "wrench" icon  , which is located near the top-right side of the browser window and then click History.
Deleting HistoryPress CTRL + Shift + DEL to open the Clear Browsing Data Window.
or
- Click on the "wrench" icon , which is located near the top-right side of the browser window.
- Move your mouse over Tools, then select Clear browsing data...

- Select the amount of time you want to go back to delete in your history. You can choose from the past hour, the past day, the past week, the last four weeks, and the beginning of time.
- Select the types of history you would like to delete. You can choose as many as you like from this list: Clear browsing history, Clear download history, Empty the cache, Delete cookies and other site and plug-in data, Clear saved passwords, and Clear saved Autofill form data.

- Click the Clear browsing data button. This will clear the selected types of Internet history for the chosen time period.
Click Help and then About. Within the About Opera window you'll see the full path to where the cached files are stored. Browse to that file path to view cached files.
Deleting HistoryOpera users can delete their history by clicking the "File" menu, "Preferences", "History", and click "Empty now" button. In addition, users can check "Empty on exit" if they wish for this task to occur each time they exit the browser.
Press Ctrl + H to open the left-side history bar.
or
Click on the "gear" icon  , which is located near the top-right side of the browser window and then click History.
Deleting History- Click on the "gear" icon , which is located near the top-right side of the browser window.
- Click the Reset Safari... link to get the below window. Leave everything checked if you want to clear everything out or just keep Clear history checked to clear the history. Once your options have been selected click the Reset button.

Netscape users
Viewing History- Microsoft Windows users can view history by first opening Netscape and click the "Edit" menu, "Preferences", "History", and view the location where Netscape is storing your files. Next, open this folder within Explorer.
- Netscape users can delete their history files by clicking the "Edit" menu, "Preferences", "History", and click the "Clear History" button.
Need to increase your Internet connection speed/ There are a number of tweaks out there that will enable you to maximize your system’s performance and likewise, there are lots of things you can do to tweak your Internet connection to boost Internet speed. There are tons of them out there, but this article just lays out two of the most useful ones.
Tweak 1: Un-reserving bandwidth
By Default, XP reserves 20% of your bandwidth for it’s own use. This is a crying shame and should be undone immediately. To do this, you will not require any additional software, just follow the steps below.
- Access the Group Policy Editor. This can be done by typing gpedit.msc in the Run box (Start, and then Run). You will now be looking at something like this.
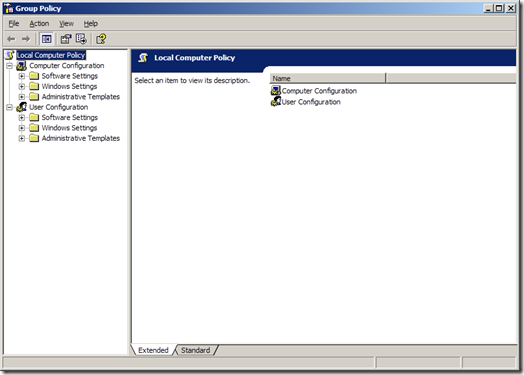
- Navigate to Computer Configuration/Administrative Templates/Network/QOS Packet Scheduler using the pane on the left side.
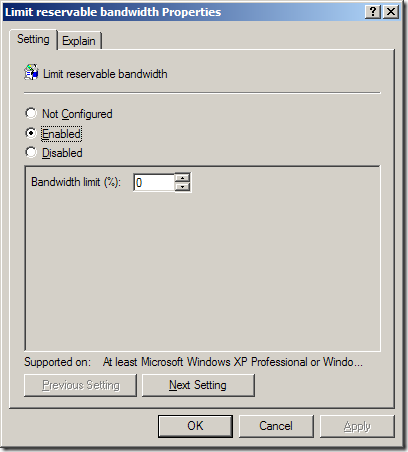
- In the left pane, there should be a Setting with the name Limit reservable bandwidth, right-click this and select properties.
- Now this might seem a bit weird, as the State will say “Not Configured” but Windows by default will reserve 20%. So the trick is to set it to reserve 0%. You can do this by clicking enabled and then setting the Bandwidth Limit % to 0. It should look like the image below.
- Hit OK then close the Group Policy Editor.

That’s it! You’re done with the first tweak. Just a quick side note here, there are lots of other little things you can change easily using the policy editor. Feel free to wander around!
Tweak 2: Optimizing TCP/IP settings
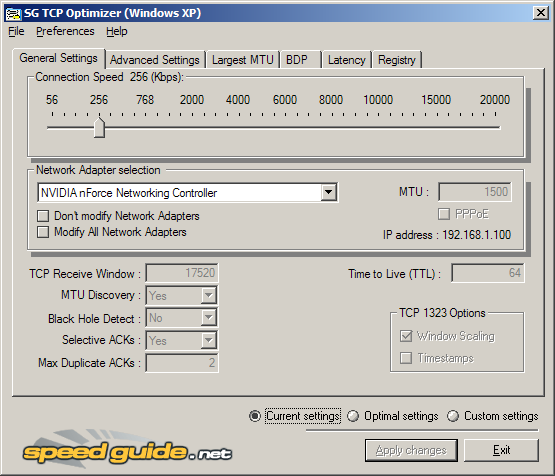
This next tweak is going to require a piece of freeware called SG TCP Optimizer. This nifty little utility will optimize the manner in which your PC sends and receives data packets, which will as a result speed up your connection. Though It is most effective for broadband connections, it works for just about any type of connection.
- Download SG TCP Optimizer. You don’t need to install it, just double-click and it will run. Once you run it, you should be looking at this :
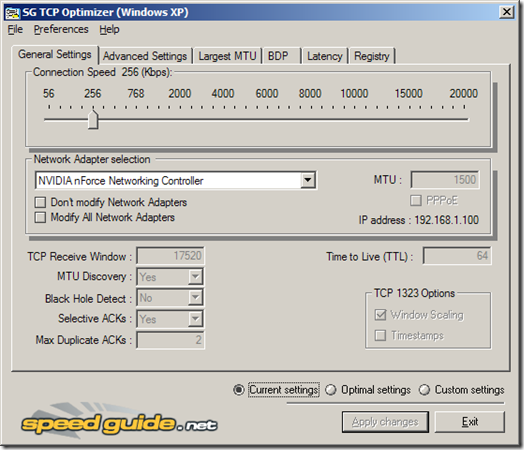
- That is quite an intimidating interface, but we won’t be touching most of it. Under the General Settings tab, just drag the slider to match your connection’s download speed. Then, at the bottom of the same window, select the “Optimal Settings” radio button and click “Apply Changes”.
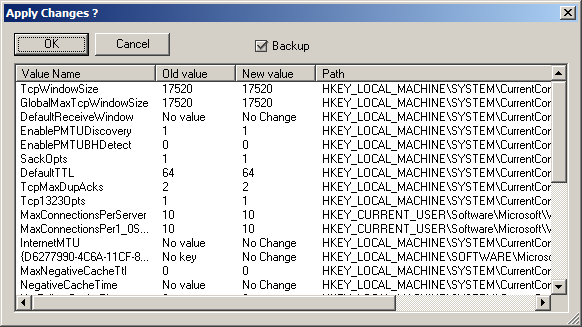
- You will now be looking at a window like the one below.
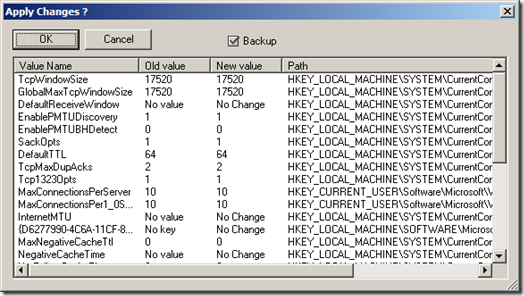
- Make sure that the “Backup” tick box is ticked and then click OK.
- All that’s left is to reboot your system, in order to apply the changes. You will be prompted to do so.
- Once your system has rebooted, surf around for a while. If for whatever reason you feel your connection has been affected negatively, then fear not, for the changes you made can be undone. Start SG TCP Optimizer, click File and choose restore backed up settings. This will bring up a dialog box where you can navigate to where you downloaded the program. There, you will find a file with the extension .spg with a filename containing the date.For example If you applied the changes on the 21st of February “sg_backup_2008-02-21-xxxx.spg” would be the filename, where the xxxx is any number. Once you find this file select it and press open. This should bring to a dialog box similar to the one shown above. Click OK and reboot. Your original settings are now restored.
There you have it. Your connection is now tweaked and ready to go! Any questions, post a comment!

Disclaimer: We should not be held liable for any damage caused in the process of updating Samsung Galaxy ACE S5830. It is very unlikely that your device will be damaged if you follow all the instructions to the point which are mentioned in procedure.Note down your current firmware version from “Settings > About Phone” so that you can revert to that particular version at any point of time. Also, the best part is that applying this update won’t root the device in any manner. Just in case if your device is already rooted, then the root access will be revoked and you can reclaim the lost warranty.
Backup all your data like SMS Contacts, Call Log, Images, Music and other core data manually with the help of below mentioned instructions. Don’t use KIES to back up the data. Also, it’s recommended that all the target backup files should be copied to your desktop so that if your phone gets completely formatted, then too you can restore the data easily.
SMS – Use “SMS Backup & Restore app”,KIES Mode in your device should be enabled from the path “Settings > Wireless & Network > USB Settings > Samsung KIES”. Apart from this, you also need to enable the USB Debugging Mode in your phone from the path “Settings > Applications > Development > USB debugging”
Contacts – Sync with the Gmail application,
Call Log -Call Log and Restore
Images, Songs, Videos, Files – Copy to internal / External SD Card,
APN and MMS Settings – Note down from the path “Applications > Settings > Wireless and Network > Mobile Networks > Access Point Names”
Uninstall or Disable all the security suites installed in your computer & Phone as these tools interrupt the firmware update process.
So assuming that you have followed all the instructions mentioned above, it’s now time for you to proceed to the next step where we have summed up a detailed tutorial on how to apply this update.
Procedure to Update Galaxy ACE S5830 with XWKTM Gingerbread 2.3.6 Firmware:

- Download Odin and XWKTM Firmware Package from here to your computer. Extract both the zip files in your PC and then open the Odin in your computer. Match the extracted files with the below mentioned image.
- The download mode in Galaxy ACE S5830 can be entered by pressing down on Volume Down Key + OK button, and holding both simultaneously press the Power Button. If device boots up in normal mode, then you need to again try entering the device in the download mode.
- Once the device is booted in the download mode, connect your phone to the computer with the help of original USB cable. Assuming that Odin is opened, you will see that the ID : COM section in your Odin turns Yellow which will indicate that all the drivers have been installed successfully.
- Now, all you need to do is to just click on “OPS” tab to select “Cooper_v1.0.ops”, tick mark on “One package” option. Up next, you will have to select the file “S5830XWKTM_S5830OXXKT3_S5830XWKT7_HOME.tar.md5” by clicking on “One Package” tab.
- Now, click on “Start” tab to start the process of firmware update and once the firmware update is done, the device will be rebooting. It will take around 4 – 5 minutes for the device to apply this update. Once you see that the Language settings are being asked, you can disconnect the phone and turn Off so that it can be then entered in the recovery mode.
- Recovery mode in Galaxy ACE is entered by pressing Menu Button, and holding this you need to press the Power Button. Once you enter into the recovery mode, choose the options Wipe data/factory reset and also you need to select Wipe Cache partition and then reboot your device by selecting reboot system now for rebooting the device.
Note: If the Odin gives error at param.fs or say at any point then you will have to reboot your computer and try applying the process from the start. Ensure that you have installed all the latest possible drivers of your phone. Also, KIES should be the latest version.
So there you go, you have now successfully applied the update of Gingerbread 2.3.6 Firmware dubbed as XWKTM in your device. Do let us know in the comments section if you face any issues as we will try our level best to fix the same.
You have heard about Google’s new single privacy policy for all its services. From March 1, 2012, most Google services and products will come under a single privacy policy. You no longer will be a Gmail, Google+, YouTube, or Google Docs user, but a Google account holder. Many users consider this new change will give them a better and personalized Google experience, and few preferring their accounts not to be linked. What will be that, would you like to delete all your Google search history and web history before March 1? If so, here is how it is.
Go to https://www.google.com/history and sign in with your Google account. You can see all your web history listed there.

To remove all your web history, enable the check box (see screenshot above) and click ‘Remove all web history’. If you want to keep some of your web history undeleted, you can do that by unselecting the desired history. Then click OK to remove all history from your account.

Please note that, if you choose deleting everything, your web history will also be paused until you reactivate it. You can read more about Google’s new privacy policy from here.
Go to https://www.google.com/history and sign in with your Google account. You can see all your web history listed there.

To remove all your web history, enable the check box (see screenshot above) and click ‘Remove all web history’. If you want to keep some of your web history undeleted, you can do that by unselecting the desired history. Then click OK to remove all history from your account.
Please note that, if you choose deleting everything, your web history will also be paused until you reactivate it. You can read more about Google’s new privacy policy from here.


